If you’re looking to elevate your embroidery skills, creating a 3D puff design can set your projects apart. You’ll need to gather the right materials and select suitable fabrics to guarantee a sturdy base. After preparing your design, you’ll find that the setup of your machine is vital for achieving that desired depth. But the real magic happens when you start stitching and layering the puff foam. At this point, you might wonder about the finishing touches that can truly make your design pop. Let’s explore the next steps to perfect your technique.
Understanding 3D Puff Embroidery
Understanding 3D puff embroidery means grasping how this unique technique adds depth and texture to your designs. Unlike traditional flat embroidery, 3D puff embroidery utilizes foam to elevate certain elements, creating a striking visual impact. When you apply this technique, you’re fundamentally giving your designs a three-dimensional appearance that captures attention and enhances detail.
To achieve the 3D effect, you’ll start by selecting specific areas of your design that you want to pop. These areas are then stitched over a layer of foam, which expands during the embroidery process, raising the threads above the fabric. The result? A dynamic look that stands out, making your designs ideal for logos, sportswear, or any item where you want to make a statement.
You’ll find that 3D puff embroidery not only elevates the aesthetic but also adds a tactile element that invites touch. This technique allows for creativity, letting you combine different colors and textures to achieve unique effects.
Required Materials
To create stunning 3D puff embroidery, you’ll need a few essential materials that will guarantee your project turns out beautifully. First, grab some puff foam, which will give your design that raised look.
You’ll also need a suitable stabilizer to support the fabric while you stitch. Choose a tear-away type for easy removal after completion.
Next, get a selection of embroidery threads in your desired colors. Make sure they’re compatible with your sewing machine and suitable for the fabrics you plan to use.
A sharp embroidery needle is vital, ideally one designed for thicker materials since it’ll help pierce through the puff foam and fabric layers cleanly.
Don’t forget your embroidery machine! If you don’t have one, consider visiting a local embroidery service.
Finally, keep a pair of scissors handy for trimming any excess foam or threads during the process.
With these materials in hand, you’re ready to set off on your 3D puff embroidery journey. Being well-prepared won’t only streamline your workflow but also enhance your overall experience as you create eye-catching designs.
Choosing the Right Fabric
When it comes to 3D puff embroidery, picking the right fabric is essential for achieving the best results.
You’ll want to take into account fabric weight, as it affects the overall look and feel of your design.
Additionally, think about stretch and durability, since these factors will determine how well your embroidery holds up over time.
Fabric Weight Considerations
Choosing the right fabric weight is essential for ensuring your 3D puff embroidery design maintains its shape and stands out as intended. A fabric that’s too heavy can weigh down the puff, while one that’s too light mightn’t support the structure properly. You’ll want to find a balance that enhances the design without compromising its integrity.
Here are some fabric weight considerations to keep in mind:
-
Cotton Twill: This medium-weight fabric offers a sturdy base and a nice texture, making it perfect for vibrant puff designs.
-
Polyester Blend: Lightweight yet durable, this fabric helps the puff maintain its form while providing a smooth surface for stitching.
-
Canvas: Heavier and more robust, canvas supports larger designs but may require additional care during the embroidery process.
-
Fleece: Soft and inviting, fleece can add a unique dimension to your design but may need stabilizers to hold the puff effect.
Stretch and Durability
Selecting a fabric with the right stretch and durability guarantees your 3D puff embroidery design not only looks great but also withstands the wear and tear of everyday use. You’ll want a material that retains its shape while allowing the puff embroidery to pop. Fabrics like cotton blends and performance polyester are excellent choices as they combine resilience with flexibility.
Here’s a quick guide to help you choose the right fabric:
| Fabric Type | Stretch & Durability |
|---|---|
| Cotton Blend | Good stretch, moderate durability |
| Performance Polyester | Excellent stretch, high durability |
| Spandex Blend | High stretch, good durability |
When you opt for a fabric with a good balance of stretch and durability, your 3D puff embroidery will maintain its form and appearance over time. Avoid overly rigid materials that can restrict the embroidery’s puff effect. By carefully choosing your fabric, you ascertain that your design not only stands out but also lasts, making it a worthwhile investment for anyone looking to showcase quality embroidery.
Preparing Your Design
When you’re preparing your design, start by choosing the right design software that meets your needs.
Next, select the appropriate thread types to achieve that desired puff effect.
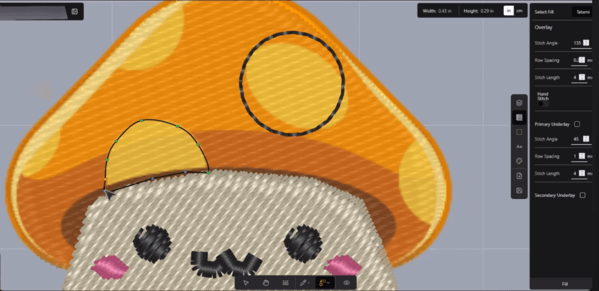
Choose Design Software
Finding the right design software is crucial for creating an effective 3D puff embroidery design that meets your vision. With so many options available, you’ll want to choose software that provides the features you need to bring your ideas to life. Look for programs that allow you to manipulate designs easily and offer a wide range of tools for customization.
Consider these aspects when selecting your software:
-
User Interface: A clean, intuitive layout helps you navigate your design process smoothly.
-
3D Visualization: Look for software that can showcase your design in three dimensions, allowing you to see how the puff effect will look.
-
File Compatibility: Confirm it supports various file formats, so you can easily import and export designs.
-
Support and Resources: Access to tutorials and a responsive customer support team can make a huge difference when you’re learning.
Select Thread Types
Choosing the right thread types is essential for achieving the desired texture and appearance in your 3D puff embroidery design.
Start by considering the thickness and material of the thread. Polyester threads are a popular choice due to their durability and vibrant colors, while rayon threads offer a lovely sheen. Both can work well, but polyester is generally more resistant to fading and fraying.
Next, think about the weight of the thread. A heavier thread will give you more depth and dimension, while a lighter thread can create a subtler effect. For puff embroidery, you’ll typically want to select a medium to heavy weight thread that can withstand the raising process without breaking.
Additionally, consider the color palette. It’ll help to choose colors that contrast well with your fabric, ensuring the design pops.
Finally, always check the compatibility of your thread with your embroidery machine to avoid any issues during stitching.
Set Design Dimensions
To create a successful 3D puff embroidery design, you should always set the dimensions of your design carefully to confirm it fits well on your chosen fabric. Start by measuring the area where you plan to place the embroidery. This guarantees your design won’t be too large or too small, creating a balanced look.
Consider the following when setting your dimensions:
-
Design area: Measure the exact space on the fabric to avoid overcrowding or leaving too much blank space.
-
Aspect ratio: Maintain the correct proportions of your design to prevent distortion when stitched.
-
Puff height: Decide how high you want the puff effect to be, as this impacts the overall look and feel.
-
Stitch count: Estimate the number of stitches needed, ensuring it aligns with your embroidery machine’s capabilities.
Once you’ve established these parameters, you can move on to fine-tuning your design. Setting the right dimensions not only enhances the aesthetics but also confirms the durability of your embroidery.
A well-planned design will stand out beautifully on your fabric, making your 3D puff embroidery truly pop!
Setting Up Your Machine
Before diving into your 3D puff embroidery project, make sure your machine’s settings are perfectly adjusted for this specific technique.
Start by selecting the right needle. A thicker needle, like a 75/11 or 80/12, is ideal for piercing through the puff foam. Next, choose a strong, polyester embroidery thread to maintain durability and vibrancy.
Adjust the tension settings on your machine. For puff embroidery, you’ll typically want a lower tension to accommodate the foam’s thickness, allowing the thread to sit nicely on top.
Be sure to use a stabilizer that complements your fabric; a cut-away or tear-away stabilizer works well to support the foam and keep your design crisp.
Don’t forget to set your machine’s speed. Slower speeds help promote precision and control while stitching, especially with the added dimension of puff foam.
Finally, confirm your bobbin is wound with the same thread as your top thread for consistent results.
With these adjustments in place, you’re ready to create a stunning 3D puff design that pops beautifully off the fabric. Take a moment to double-check everything before you start stitching!
Stitching the Base Layer
Start by stitching the base layer of your design, as it provides the foundation for the 3D puff effect. This layer is essential because it defines the shape and depth of your embroidery. Make certain you choose a thread color that complements your puff foam, guaranteeing a cohesive look.
Use a medium-density stitch for the base layer to create a solid yet flexible surface. As you work, keep an eye on your machine’s tension to avoid puckering. You want the stitches to lay flat and evenly distribute across the fabric.
Here are some things to take into account while stitching the base layer:
-
Thick, bold lines that outline your design, giving it a strong presence.
-
Vibrant colors that pop against the fabric, enhancing visual appeal.
-
Precision stitching that guarantees clean edges, setting the stage for the puff.
-
Consistent patterns that create a uniform look, showcasing your attention to detail.
Once you’ve completed the base layer, you’ll be ready to move on to the next exciting step in creating your 3D puff embroidery design.
Adding the Puff Foam
Now that the base layer is complete, it’s time to carefully position the puff foam over your design to achieve that desired 3D effect.
Begin by cutting the puff foam into shapes that match the areas of your design you want to elevate. Make certain the pieces are slightly larger than the outlined areas to guarantee full coverage.
Next, use a fabric adhesive to lightly secure the foam in place. This will help prevent it from shifting during stitching. Once you’ve positioned the foam, lower your embroidery machine’s presser foot and select a zigzag stitch on your machine. This stitch is essential for attaching the foam effectively.
Start stitching over the foam, ensuring you cover the edges securely to keep it in place. Move slowly and steadily to avoid any misalignment. It’s vital to keep an eye on the tension; too tight, and you could compress the foam, losing that puffed effect.
After you’ve stitched around the foam, trim any excess that might be sticking out. This step guarantees a clean finish, preparing your design for the next phase of the embroidery process.
Finishing Touches
Adding the finishing touches to your 3D puff embroidery design enhances its overall appearance and assures a professional look. Once you’ve completed stitching, it’s time to refine your work.
Start by trimming any excess threads around the design. This simple step helps eliminate distractions and emphasizes the puff effect.
Next, consider steaming your design to smooth out any irregularities. Be cautious not to overheat the puff foam; a gentle steam will do the trick. After steaming, inspect your design for any loose edges or seams. Secure them if necessary to guarantee durability.
Finally, think about the placement and presentation of your finished piece. Here are a few ideas to inspire you:
-
Framing: Showcase your design in a stylish frame for a polished look.
-
Patches: Transform your embroidery into a patch for clothing or bags.
-
Gifts: Attach your design to a gift bag or tag for a personalized touch.
-
Merchandise: Consider using your design on hats, shirts, or other apparel.
These finishing touches will elevate your 3D puff embroidery, making it truly stand out.
Care and Maintenance Tips
Caring for your 3D puff embroidery design guarantees its longevity and keeps it looking fresh and vibrant. To maintain its quality, always wash your embroidered items with care.
Use cold water and a gentle cycle to prevent any fraying or damage to the puff elements. Avoid bleach and harsh detergents, as these can fade the colors and weaken the fabric.
When it comes to drying, air-drying is your best bet. Lay your item flat to avoid distorting the embroidery. If you must use a dryer, opt for a low heat setting, but keep an eye on it to verify it doesn’t get too hot.
For storing your embroidered pieces, keep them in a cool, dry place, away from direct sunlight to prevent fading. If you notice any dust or lint on your design, gently brush it off with a soft cloth or a lint roller.
Lastly, if you need to iron your embroidered items, turn them inside out or use a pressing cloth to protect the puff embroidery from direct heat.
Frequently Asked Questions
Can I Use 3D Puff Embroidery on Knit Fabrics?
Think of your knit fabric as a cozy canvas; 3D puff embroidery can add a vibrant, textured touch. Just verify the fabric’s stretchiness and weight complement the puff’s height for stunning results.
How Do I Troubleshoot Puff Foam Not Adhering?
If your puff foam isn’t adhering, check the temperature settings, guarantee proper pressure, and verify the adhesive’s compatibility with your fabric. You might also want to clean the fabric surface before reapplying the foam.
What Is the Best Stabilizer for Puff Embroidery?
You wouldn’t want your puff embroidery to flop like a bad TV show! The best stabilizer is a cut-away or tear-away type, which supports the foam while allowing enough flexibility for that puffy effect.
Can I Wash 3D Puff Embroidery Designs?
Yes, you can wash 3D puff embroidery designs. Just make sure to use cold water and a gentle cycle. Avoid harsh detergents and air dry to maintain the design’s shape and texture.
How Do I Remove Puff Foam After Stitching?
To remove puff foam after stitching, gently pull it away from the fabric. Use scissors to carefully trim any excess foam, ensuring you don’t cut the thread. Take your time for a clean finish.
Conclusion
To sum up, creating a 3D puff embroidery design is a rewarding journey that transforms fabric into art.
With the right materials and a bit of practice, you’ll elevate your embroidery skills and impress everyone with your textured creations.
So, why wait? Immerse yourself in this creative adventure, and let your imagination soar as you stitch your way to stunning designs that pop!
Remember, every project is a step closer to mastering the art of 3D embroidery.