If you've ever looked at a photo and thought, “That would look amazing stitched onto a hoodie,” you’re not alone. At EMBpunch, we’ve helped hundreds of businesses, creators, and everyday folks turn their favorite photos into beautiful embroidered designs. But here’s the thing, digitizing an image for embroidery isn’t as simple as dragging and dropping it into your machine. There’s some art, a ton of software, and a few hard-earned secrets. This guide? It’s us pulling back the curtain.
What It Actually Means to Digitize an Image for Embroidery
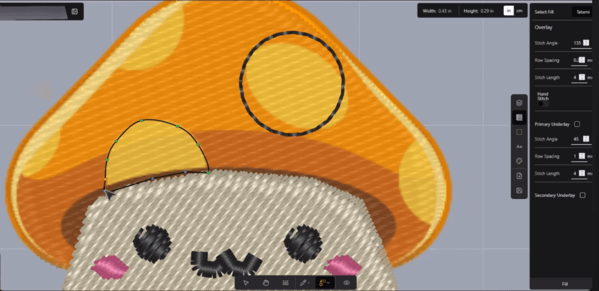
“Digitizing” doesn’t mean uploading a file and hitting ‘Go’. It means turning images into stitch commands your machine can actually read. Colors become thread. Outlines become paths. Pixels become stitches. You use embroidery software to map out every move, stitch by stitch.
And no, it’s not AI. It’s manual. Every angle, every density, every direction… set by a real human who knows what they’re doing.
Bad digitizing = bad embroidery. Simple.
Understanding the Language of Embroidery Digitizing
When you’re stepping into the world of embroidery digitizing, you’ll encounter a whole new vocabulary. We’re talking terms like satin stitch, fill stitch, underlay, density, and compensation. These aren’t just fancy terms. They’re actually super useful. Satin stitches, for example, are smooth and have a nice shine to them. Perfect for lettering or clean outlines. Fill stitches, on the other hand, cover larger areas with texture and durability. Stitch density? It refers to how closely packed those stitches are, and trust us, it can make or break your design.
What Makes a Good Digitized Design?
There’s no one-size-fits-all when it comes to good digitized design. But there are common traits that great embroidery files share: manageable stitch counts, clean outlines, high resolution, a limited thread color palette to avoid constant thread changes and a proper stitch types based on the design complexity. More rare, but equally impressive, are techniques like puff embroidery or simulated shading for portraits. These require advanced digitizing knowledge and careful attention to stitch direction and density. At EMBpunch, we live for that kind of challenge.
Why Digitizing Isn’t Just Clicking a Button
Let’s clear this up. Just because software exists, doesn’t mean digitizing is fully automated. Even with AI tools and auto-digitizers, you still need human input to tweak the density, assign underlays, and choose the right stitch types for different sections. Otherwise, the final stitch-out might pucker, shift, or look nothing like your original image. Real digitizing is an artistic process, not a shortcut.
The Deep Roots of Embroidery & Digitizing
Embroidery’s ancient. Think Chinese silk robes, medieval tapestries.
Digitizing? That’s modern magic. “Digitize” comes from Latin digitus, finger or number. Translation: turning images into numbers machines get. “Embroidery” means embellishment in Old French. So what you’re really doing is blending centuries-old art with cold, hard digital precision.
That’s power.
Our Process: How We Digitize Your Image
First, we analyze your image. Is it a photo, a logo, a sketch? Then we decide how to simplify its complex gradients, for example, don’t translate well to thread. We choose thread colors that closely match your original, reduce unnecessary detail, and create clear outlines.
From there, we use professional embroidery software to manually assign stitch paths. Finally, the files are then exported by our digitizers into the format your embroidery machine needs, whether it’s .PES, .DST, .EXP, or something else.
What Software Do You Need to Digitize for Embroidery?
Great question. For pros like us at EMBpunch, we use industry-grade software like Wilcom, Hatch, and Pulse. If you’re experimenting at home, there are free options too. Inkscape with Ink/Stitch, for example. But fair warning: free software comes with limitations.
Fewer tools, fewer stitch types, and a much steeper learning curve. AI-powered tools are entering the scene, but they’re not fully reliable yet. They often misjudge fabric types or ignore important compensation settings.
Is Embroidery Digitizing Profitable?
Absolutely. Especially if you’re in the business of selling hats, branded merch, custom apparel, or branded merch. You can run your own brand. All you need is to make high-quality digitized files that lead to crisp, professional-looking stitch-outs that customers are willing to pay for. And if you're a digitizer yourself, you can earn anywhere from $1000 to $5,000/month. It all depends on skill level, workflow efficiency, and client base.
Is Embroidery Hard for Beginners?
At first? You might find it a little hard. But it gets easier. Most beginners struggle with choosing the right stitch types, software handling, and understanding fabric behavior. But once you’ve got a few stitch-outs under your belt, things automatically start to click. With enough practice, and maybe a few YouTube tutorials, you could absolutely learn it yourself.
Self-Teaching Embroidery? Totally Possible.
There’s a massive community out there. Forums, Facebook groups, courses, you don’t need a degree to learn embroidery digitizing. All you need is patience, curiosity, and a willingness to mess up (because you will… we all do).
What’s the Easiest and Strongest Stitch?
Easiest? The running stitch. It’s literally just one stitch after another. Great for outlines and simple shapes. The strongest? That would be the satin stitch or sometimes the triple stitch. These are perfect for logos, thick text, or bold borders.
Which Needle Should You Use?
Depends on your fabric. Lightweight fabrics? Go for 70/10 or 75/11 needles. Heavy denim or caps? We'd recommend using a sturdier needle like a 90/14, or even a ballpoint if you're working with knits. Matching your needle to the fabric really helps prevent puckering and thread breaks.
Can AI Digitize Embroidery?
Short answer: Yes, but not perfectly. Although AI-powered embroidery software is improving, but it still lacks the nuance of a human digitizer. And sometimes it makes very silly mistakes. At Embpunch, we’ve tested a few tools that automate the process, and while they’re fun to play with, they still need human adjustments, especially for things like underlays, stitch compensation, and color optimization.
Computer or Not? You’ll Need One.
If you want to digitize, yes, you’ll need a computer. Most embroidery machines don’t have onboard digitizing capabilities. Even basic edits like resizing or rotating require software.
File Formats: What’s the Right One?
The “right” file format depends entirely on your machine. Commercial machines often require .DST, while home machines might need .PES or .EXP. If you're unsure, check your user manual, or honestly, just shoot us a message at EMBpunch. We deal with this daily and can help convert your design into whatever format you need.
Cost of Digitizing (and Why It’s Worth It)
For simple designs, you're usually looking at around $10 to $30, totally depends on the complexity and who you go with. For complex logos or detailed photo digitizing, it could be $50 or more.
At EMBpunch, we base our pricing on stitch count, design complexity, and turnaround time. There’s also something called a digitizing fee. A one-time cost for converting your design. But here’s the good news: once it’s digitized, you can reuse that file as many times as you want.
Embroidery vs. Printing: Which Is Better?
We’re biased, but embroidery wins, especially for logos, workwear, and anything that needs to look sharp and last forever. Print might fade or peel. Embroidery is stitched directly into the fabric, giving it depth, texture, and durability.
FAQs
How do I digitize an image for embroidery?
- Your machine can’t read a PNG or JPG. You need to convert it into stitches. Simply use an embroidery digitizing software to digitize an image for embroidery.
What software do I need to digitize for embroidery?
- Pro options: Wilcom, Hatch. Free options: Ink/Stitch. For beginners, Embrilliance Essentials can be helpful too.
How do you transfer an image for embroidery?
- You need to export the correct stitch file. Then you can easily transfer it via USB, direct cable, or Wi-Fi.
How much does it cost to digitize for embroidery?
- Anywhere from $10–$60 depending on complexity and stitch count.
Can AI digitize embroidery?
- Sort of. But human refinement is still needed for professional results.
Do you need a computer for embroidery?
- Yes, for digitizing and file conversion, a computer is essential.
Is embroidery better than printed?
- For durability and texture? Absolutely. For full-color photos or gradients? Printing might win.
Which file is needed for embroidery?
- Depends on your machine. Common formats: .DST, .PES, .EXP.
Is embroidery hard for beginners?
- It looks hard at first but becomes easy with reps and the right tools.
How much does it cost to digitize an image?
- On average, $20–$50 per image depending on complexity.
Is embroidery digitizing profitable?
- Yes. It’s a growing niche for both service providers and product creators.
What is a digitization fee?
- A one-time charge to convert a design into an embroidery-ready file.
How much do embroidery digitizers make?
- You can make anywhere from $100 to $5,000/month or more. It depends on your clients, expertise, and volume.
Which needle for embroidery?
- Depends on your fabric type, lighter fabrics need smaller needles.
Can you self-teach embroidery?
- Yes, especially with online tutorials and practice.
What is the easiest embroidery stitch?
- The running stitch.
Which is the strongest stitch in embroidery?
- Satin or triple stitch.
How to French knot?
- Wrap the thread around the needle twice, stick it in right next to your last stitch, and pull it tight. And you’re done.
Summing Up
Digitizing an image for embroidery is both a science and an art. At EMBpunch, we specialize in turning your favorite photos and logos into stitch-ready masterpieces. Head over to EmbPunch and let’s create something incredible together.