At EMBpunch, we’ve spent years transforming jpg images into high-quality PES embroidery files for custom embroidery design, and we're excited to share our full step‑by‑step guide. We’re a USA‑based embroidery digitizing services, and we know the ins and outs of PES format conversion better than most.
Whether you're a digital novice or seasoned user, this post guides you through software tools, file formats, color handling, stitch density, and even Brother embroidery machine workflows. We’re not entirely sure there’s a simpler route, other services exist, but few match our quality, turnaround, and expert stitch control.
Breaking Old Habits in JPEG to PES Conversion
We get it. Letting go of old ways feels a bit like throwing out that worn-out hoodie you’ve had since what college? Or maybe since before college. It’s safe. Comfortable. Smells like memories (and maybe a hint of detergent from 2017). But in the embroidery digitizing online, specifically when you’re converting JPEG to PES, clinging to outdated habits is like insisting on using a rotary phone in the age of iPhones. Sure, it technically works, but… why are we doing this to ourselves?
The truth? Upgrading our process isn’t just about saving time (though that’s nice). It’s about precision, efficiency, and, dare we say, sanity. If you’ve ever sat staring at a wonky stitch preview wondering why the machine “just doesn’t get it,” then you’ve already felt the pain of outdated practices. So, let’s talk about a few of the worst offenders. And maybe, just maybe, kick them to the curb.
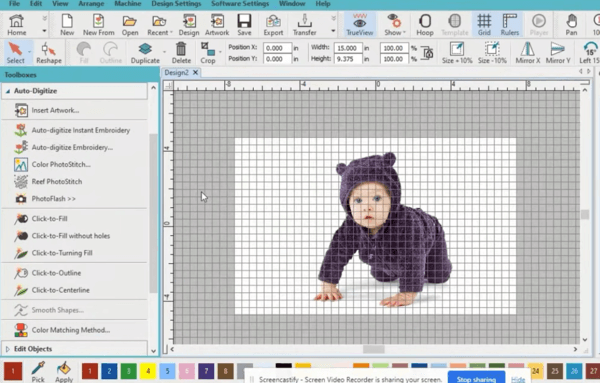
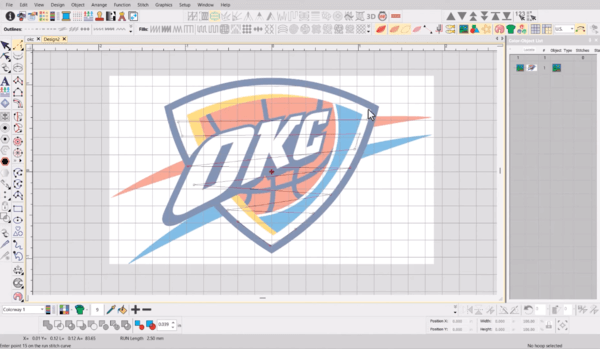
1. Manually Tracing Every Single Pixel Like It’s 2003
![]()
Some of us still fire up that clunky software and start painstakingly tracing the outline of every shape in a JPEG, pixel by pixel, like we’re Michelangelo hand-painting the Sistine Chapel ceiling. It’s romantic in theory, artistic, even, but here’s the harsh reality: it’s a colossal waste of time.
Manual tracing might give us control, sure, but it also gives us repetitive strain injury and a design that’s only as precise as our caffeine level that day. And don’t even get us started on the inevitable “oops” moments when a curve suddenly turns into a jagged corner because our mouse decided to have an attitude.
Better way? Modern auto-digitizing software has improved so much in the last five years that it’s almost eerie. Tools like Wilcom, Hatch, or even Brother’s updated software can interpret a JPEG and spit out a PES file in minutes, with stitch accuracy that, honestly, can rival our best manual attempts. We’re not saying abandon artistry. We’re saying let the software handle the grunt work, and we can spend our time refining instead of reconstructing the Mona Lisa one pixel at a time.
2. Using Web-Compressed JPEGs and Hoping for a Miracle
Here’s the thing, if we start with garbage, we’re going to end up with embroidered garbage. It’s the “junk in, junk out” law, and it’s brutal. Yet people still download a 72 DPI thumbnail from Google Images, zoom in, and wonder why the result looks like it was stitched by a toddler.
We’ve seen designs where the original logo text was so fuzzy it might as well have been written in smoke. Trying to clean that up during conversion is like ironing a shirt while wearing it. Painful, risky, and not worth it.
Better way? Always start with a high-resolution image (300 DPI or higher). Better yet, grab the vector file if it exists. If we’re stuck with a low-res JPEG, there are AI-based upscalers (Topaz Gigapixel, Adobe Firefly, even Canva’s built-in enhancer) that can give us a fighting chance before the conversion.
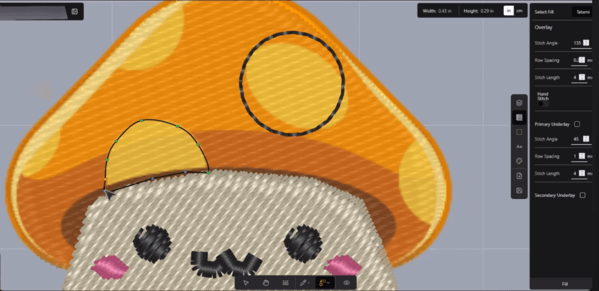
3. Ignoring Stitch Type Optimisation Because “Default is Fine”
If we’ve ever opened our digitizing software, imported a design, hit “convert,” and then immediately sent it to the embroidery machine… we’re guilty. The defaults might work for some designs, but often, they lead to puckering, loose edges, or the dreaded “why is this bird’s wing now a triangle?” effect.
Default settings treat every shape like it’s the same. But a satin stitch for tiny text? Disaster. Fill stitch for a fine outline? Just no.
Better way? Learn the stitch types. Play with them. Swap out a fill for a satin, a satin for a run stitch, adjust densities, small tweaks can make the difference between a design that pops and one that looks like it survived a washing machine apocalypse.
4. Saving Directly to PES Without Previewing on the Machine Simulator
Yes, PES is the end goal, but treating it like the final step without checking the “digital dress rehearsal” first? Rookie move. Without previewing, we miss seeing the stitch order, thread jumps, and weird layering choices that our software decided were “good enough.”
We once skipped the preview, sent the file to the machine, and ended up with a logo where the background stitched last, on top of the text. It looked… abstract. Very modern-art-gallery, but not great for the client.
Better way? Every decent digitizing program comes with a stitch simulator. Use it. Watch the sequence. Make sure nothing is stitching over something it shouldn’t. That extra five minutes will save us hours of embarrassment (and re-hooping).
5. Treating PES Conversion Like a One-Size-Fits-All Process
Here’s where things get sneaky. Even if we’re doing everything else right, high-res source, great stitch types, perfect sequence, PES files aren’t universally identical. The same PES might stitch beautifully on one Brother machine and be slightly off on another, depending on model quirks.
This is why seasoned digitizers sometimes keep multiple versions of the “same” file, each optimised for a specific machine or hoop size.
Better way? Know our machine’s quirks. Check its manual for stitch limitations, hoop dimensions, and preferred formats. If we’re sending designs to clients, ask what model they’re using. That extra question can prevent a lot of “why is this not lining up?” headaches.
Can I convert a JPG to a PES embroidery file?

Yes, you absolutely can. But it's not a direct one‑click conversion. A jpg file is a pixel‑based photographic image, whereas PES is a digitized embroidery format containing stitch instructions. What Embpunch does is meticulously digitizing, meaning we interpret designs, set stitch type, thread colors, underlay, and density before outputting a PES file compatible with your embroidery machine.
What is a PES file format?
A PES format is Brother’s proprietary embroidery file type. It includes stitch vectors, thread color codes, trims, and jump stitch control. It’s optimized for Brother embroidery machines but is widely accepted across many machines nowadays.
How to convert something to PES?
Here’s our typical conversion process at Embpunch:
Step one: Start with a solid image. Don’t mess around with low-res junk. Use a high-res JPG, PNG, or even better, vector art. Quality in = quality out.
Step two: Import it into real software. We’re talking Wilcom, SewArt, Embird, not some free tool that butchers your design.
Step three: Do the actual work.
- Trace the outlines.
- Pick the right stitch types.
- Dial in your stitch density.
- Lock in the thread colours.
Because this isn’t just "click and convert". This is digitizing done right.
What image format is best for embroidery?
Use PNG when you need transparency. It keeps your edges crisp. Use SVG when you care about quality at any size, because it scales like a beast.
JPEGs? They’re fine if you're working with detailed photos… but if the image is low-res or pixelated, you're setting yourself up for a sloppy stitch file.
Can PNG files be converted to PES?
Yes, PNG files can definitely be converted to PES with fewer artifacts than JPG. The transparent background helps, and there's less compression. The process still requires digitizing software or a service like ours, which only a professional embroidery digitizing service can do.
How to convert SVG to PES?
SVG is vector‑based, so you can import directly into digitizing software, assign stitch types, and export PES. It's typically faster and cleaner than starting from a pixel‑based image.
How to convert PDF to PES format?
If your PDF has vector artwork, you're in luck. Export that thing to SVG or EPS, drop it into your digitizing software, and boom, clean, scalable lines ready for stitch work.
But if it’s a raster PDF (also known as a flat image)? Now you’ve got to treat it like a JPEG or PNG. That means manually tracing and digitizing it, no shortcuts. So yes, you can convert a PDF to PES…
But only after you pull out the right content and prep it properly.
No clean input = no clean output. Don’t skip steps.
What files can be converted to PES?
Here’s the common file formats list: JPG, JPEG, PNG, PDF, SVG, even BMP or TIFF. They all can work. But here’s what actually matters: is it clear? Is it vector or pixel? And are you doing it yourself or letting pros like Embpunch handle it? Because if the file’s garbage, or you don’t know what you’re doing. Your final stitch file is going to look like a disaster. Right format + right hands = pro-level embroidery.
What does PES format stand for?
PES doesn’t officially stand for a multi‑word acronym. It’s simply the name Brother assigned to its embroidery file format. It's synonymous with Brother EMB format, widely recognized.
How to turn a PDF file into a PES file?
-
If vector: export as SVG/EPS -> digitize -> PES.
-
If raster: convert PDF to high‑res PNG/JPEG, then follow digitizing steps.
How to transfer an image to an embroidery machine?
Once you have the PES file:
-
Save to USB stick.
-
Insert into your Brother embroidery machine.
-
Select the design, adjust size/color if needed, and stitch out.
How do I transfer files from PC to embroidery?
Use the machine’s supported medium. USB drive or direct cable (depending on model). Copy PES file onto the drive and insert it into the machine.
How to create an embroidery file?
Use embroidery digitizing software:
- Import image.
- Trace shapes.
- Assign stitch types, color sequence, underlay, trims.
- Preview and adjust.
- Export PES (or other machine format).
How to convert JPG to JEF?
JEF is Janome’s embroidery format. Process is identical. Digitize your jpg in software supporting JEF output, then select JEF export instead of PES. Embpunch offers both PES and JEF files as needed.
Is there a way to convert JPEG to PNG?
Yes. Using graphic software like Photoshop, GIMP, or even free online tools. But note: conversion of formats doesn’t create vector data. It's still pixel‑based. It may help reduce compression artifacts or add transparency before digitizing.
Can you convert JPG to PES?
In short: yes, through digitizing. Automated converter tools exist, but often yield poor stitch quality. At Embpunch, we manually refine each design. Our clients get precise stitch density, thread sequencing, color accuracy, and underlay control.
Can you use Adobe Illustrator for embroidery?
AI is helpful for creating or editing vector artwork; but it's not digitizing software by itself. You’d export from Illustrator as SVG or PDF, then use dedicated embroidery digitizing programs to convert that into PES.
What is the best digitizing software for embroidery?
Common industry tools include Wilcom, Embird, SewArt, Brother’s PE‑Design, and newer cloud tools. Each varies in features: Wilcom is powerful (and pricey), Embird covers many formats, SewArt is lightweight. Embpunch uses industry‑grade software plus our internal standards to output consistent PES files.
Frequently Asked Questions (FAQs)
Q: Can PDF be converted to PES?
A: Yes, if it contains vector artwork. Otherwise, treat it like a raster image. Resize and digitize manually.
Q: What files can be converted to PES?
A: JPG, JPEG, PNG, SVG, BMP, TIFF, even PDF (if vector).
Q: Can you convert a PNG to an embroidery file?
A: Absolutely. PNG to PES is smoother than JPEG because of less compression and optional transparency.
Q: How do you make a PES file?
A: Using embroidery digitizing software. Import image, trace, assign stitches and thread colors, then export.
Q: Can I use a PNG file for embroidery?
A: Yes, as long as it's digitized into stitch instructions, it’s fine. PNG with a transparent background is often ideal.
Q: Can you use Adobe Illustrator for embroidery?
A: Only for preparing or exporting vector art; actual embroidery file creation needs dedicated digitizing tools.
Conclusion
Converting a jpg file into a high‑quality PES embroidery file is fully possible, but doing it well means digitizing properly, choosing clear image formats, assigning stitch types, handling color mapping, and exporting with correct metadata. At EMBpunch Digitizing, we specialize in turning your original image formats. Whether JPEG, PNG, PDF, or SVG, into polished, machine‑ready PES files compatible with Brother and other embroidery machines. We focus on thread color accuracy, ideal stitch density, clean underlay and trims, and fast turnaround, plus USA‑based customer service.
If you're after a free tool, options like SewArt offer simple image-to-stitch conversion, but often lack advanced controls. For professional results, custom digitizing (like ours) is the better route.
We hope this complete guide helps you understand the conversion process, from “How to convert JPG to PES” to choosing digitizing software, selecting the best input image format, and transferring your new design to your machine.
Want more? Head over to our homepage to get a free quote or upload your artwork for expert digitizing.